Build a commercial solar quote
Follow this through once and you will have a complete commercial solar quote: a roof laid out on the building, a package priced, tariffs applied, and a payback figure for the business that asked for it.
Commercial solar asks for more than a home installation does, because a business is making an investment decision. There are eleven sections rather than six, and the middle of the journey is about consumption, tariffs, and return rather than kit. The tool is one long page: sections unlock as you complete them and stay on screen, so you can scroll back to anything you have already answered.
This is the same tool your customer uses on your website. Working through it yourself is also the fastest way to see what they will be asked.
Before you start
- Have the site address to hand. Nothing happens until the quote has one.
- Have the site's annual electricity cost and consumption if the business has given them to you. If not, your account's default assumptions will fill the gaps.
- Commercial Solar Quotes must appear in your Instant Quotes list. If it does not, commercial solar is not switched on for your account.
- At least one hardware package needs to be assigned to the tool, or you will reach the packages section with nothing to choose.
Start with the address and the pin
Commercial solar asks for the site before the quote exists.
- Go to Instant Quotes → Commercial Solar Quotes.
- Click + Create new commercial solar quote. A dialog titled Create instant quote opens, with the quote type set to Commercial solar.
- Click Edit on the address. Type the address into Search for a UK address here, pick the site, and click Save address.
- Click Set pin. Drag the map so the marker sits over the property, then click Continue.
- Click Create.
You can also pick a project or a contact in that dialog. Choosing a project fills the address and the contact from the project. Choosing a contact fills the address only when the address is still empty.
The pin is worth a few seconds of care. Everything about the roof comes from it: which building the satellite imagery is fetched for, and where the roof you draw sits on the ground. On a business park with several similar units, the address alone will not always land on the right roof.
Clicking Create creates the quote and opens it.
Get the pin right first time. You can change the address or move the pin later from Settings, but doing so clears everything that was worked out from it: the roof design goes, and the sections from Usage Profile onwards are unlocked and need answering again. On a quote you have already built out, that is most of the work.
Find your way around
The sidebar on the right lists every section, with the quote's reference at the top and the price as it stands at the foot. Each entry summarises what you have answered — the sector, the annual bill, the panel count, the package — so it doubles as a check on the quote so far. Click any entry to jump to that section. The PDF button below produces a printable version, and commercial prices are shown ex VAT. On a narrow screen the sidebar becomes a bar across the top instead.
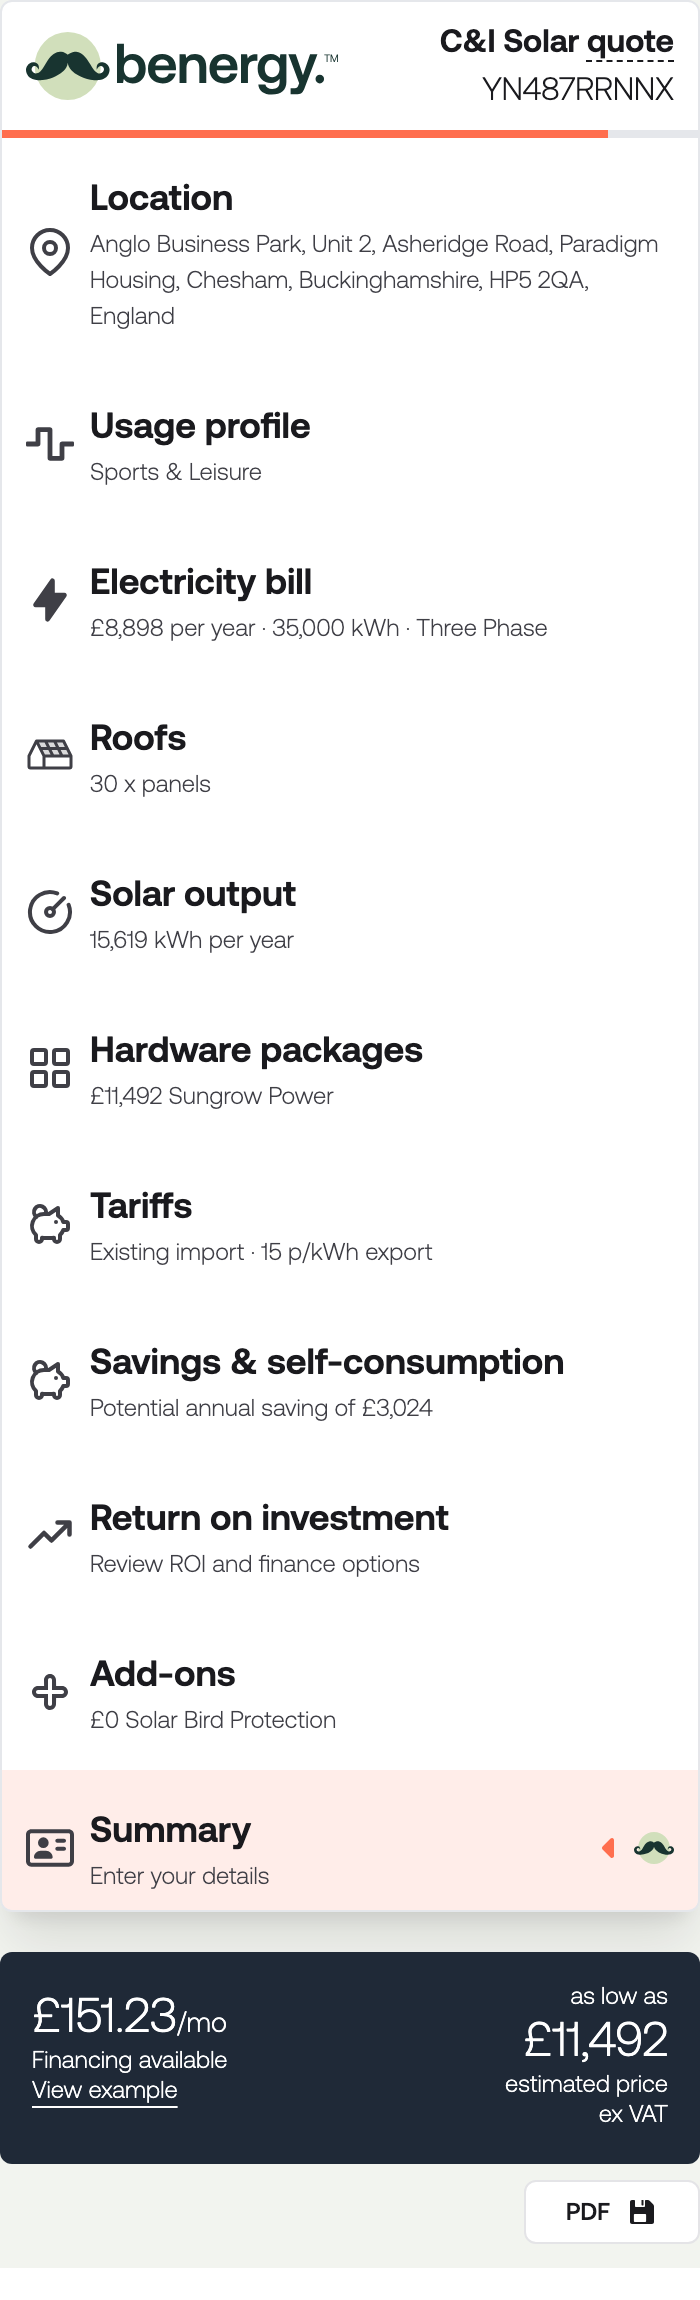
The names in the sidebar are shorter than the headings on the sections themselves — Roofs for Roof configuration, Tariffs for Tariff selection — but the order is the same.
Along the top sits the row of controls you get in every quote tool, and your customer does not.

Settings is where you link the quote to a contact and correct the address or the pin. Share gives you the quote's web address and the email templates for sending it. Both are covered in Quoting on a customer's behalf. Under that row, Last updated opens the Activity log for the quote.
Every section ends with a Next step button. Once you have clicked it the section shows Step complete, and if you go back and change something it offers Save changes instead. Nothing is lost if you stop part-way: the quote is saved as you go and waiting in your Instant Quotes list.
Usage Profile
The first question is what kind of business occupies the site. Nine sectors are offered, each with a chart of how a typical site in that sector uses electricity through the day, and examples of the buildings it covers.
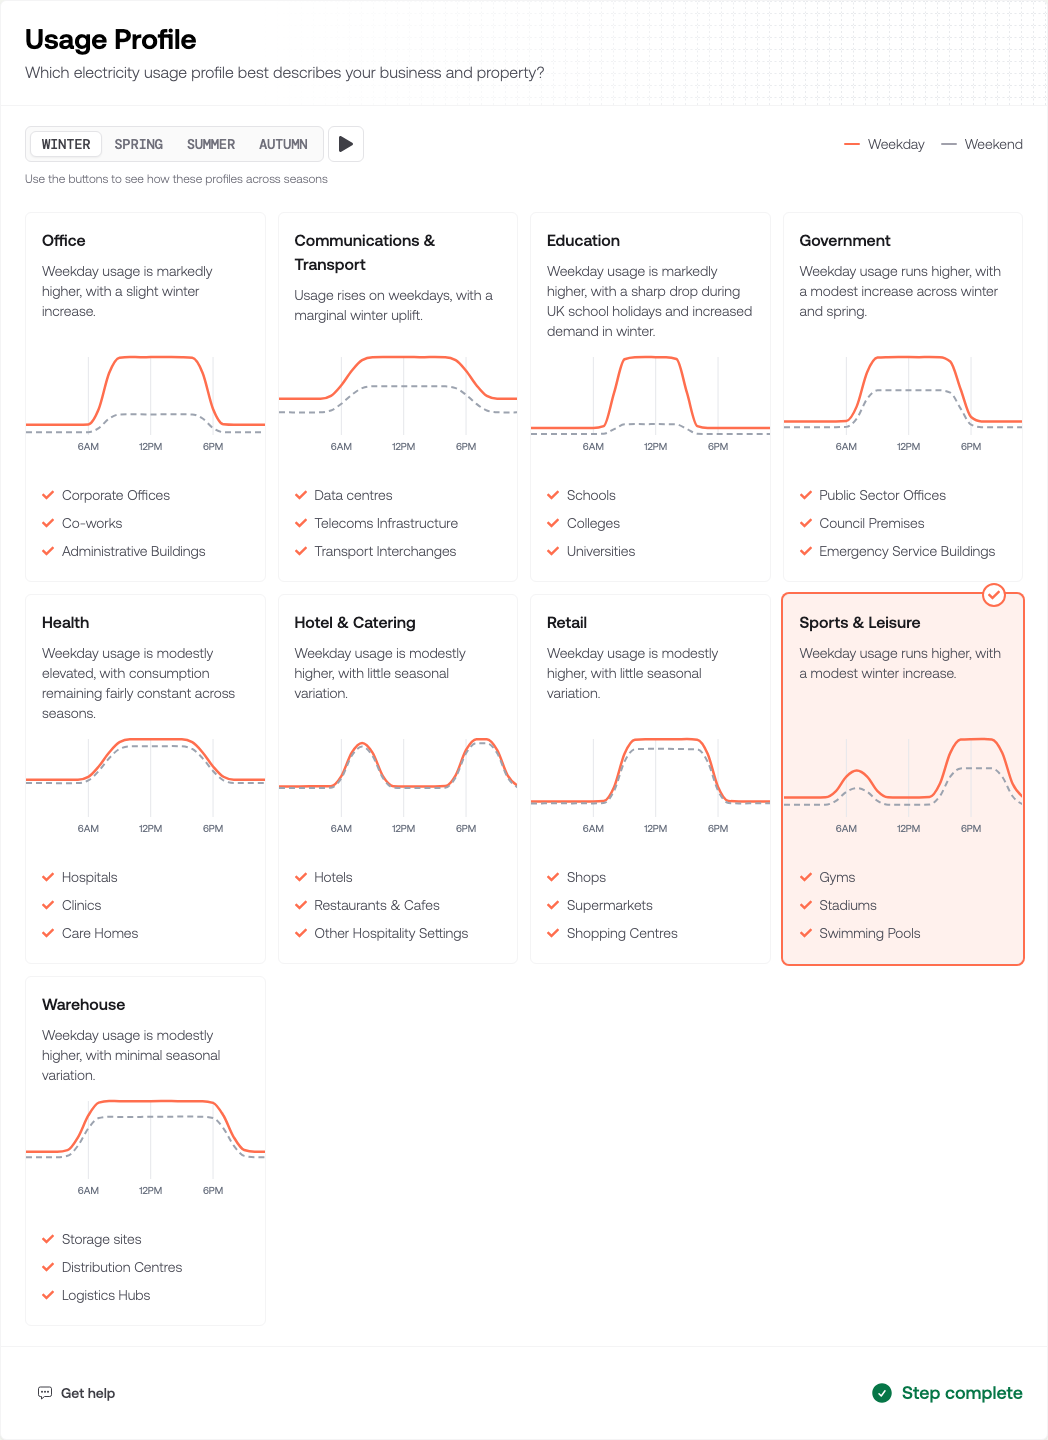
Pick the closest match rather than an exact one. The choice does two things: it sets the shape of the site's demand across the day, which is what decides how much of the generation the business uses itself, and it seeds an annual consumption figure for the next section.
The season buttons — WINTER, SPRING, SUMMER, AUTUMN — redraw the charts, and the play button cycles through them. Weekday demand is the solid line, weekend the dashed one. This is worth showing a customer on a call: a site that shuts at weekends exports far more than one that runs seven days.
Click Next step.
Use the site's own readings instead
A tenth card, Use my own usage data, replaces the typical sector shape with the site's real half-hourly readings. It is worth the extra step on any site whose pattern is unusual, because every self-consumption and battery figure downstream is worked out against that shape.
Click the card to open the panel, then choose where the readings come from:
- Upload a file — a CSV of half-hourly readings from the business's electricity supplier or smart meter app, up to 4MB. Both common export shapes work: one row per day with 48 readings across it, or one row per half hour with a timestamp. Column headings vary between suppliers and the tool works them out for itself.
- Connect Octopus Energy — paste an API key from the business's Octopus account and a year of readings is fetched. The key is used for that one request and is not stored.
Then set Fill any gaps using this profile. Data rarely covers a clean year, and the months it misses are estimated from the sector you choose here, scaled to the site's own level of usage. Pick the sector you would have picked anyway. If the readings cover the full year, this choice makes no difference to the result.
Click Read my data. You then see how many days were measured, the annual consumption those readings imply, which months were filled in, and a chart of the site's own daily shape in place of the sector's. Anything the tool had to work around — export readings ignored, gaps estimated — is listed there. Click Use this data to apply it, or change the gap-filling sector to blend it again without re-uploading.
The measured annual consumption carries into Electricity Bill and Supply in place of the sector's typical figure, so check it against a bill before moving on.
Readings belong to the address they were taken at. If you change the address or move the pin afterwards, the data is deleted along with the rest of the work from Usage Profile onwards, and needs uploading again.
Electricity Bill and Supply
This section anchors the whole savings case, so it is the one to get right.
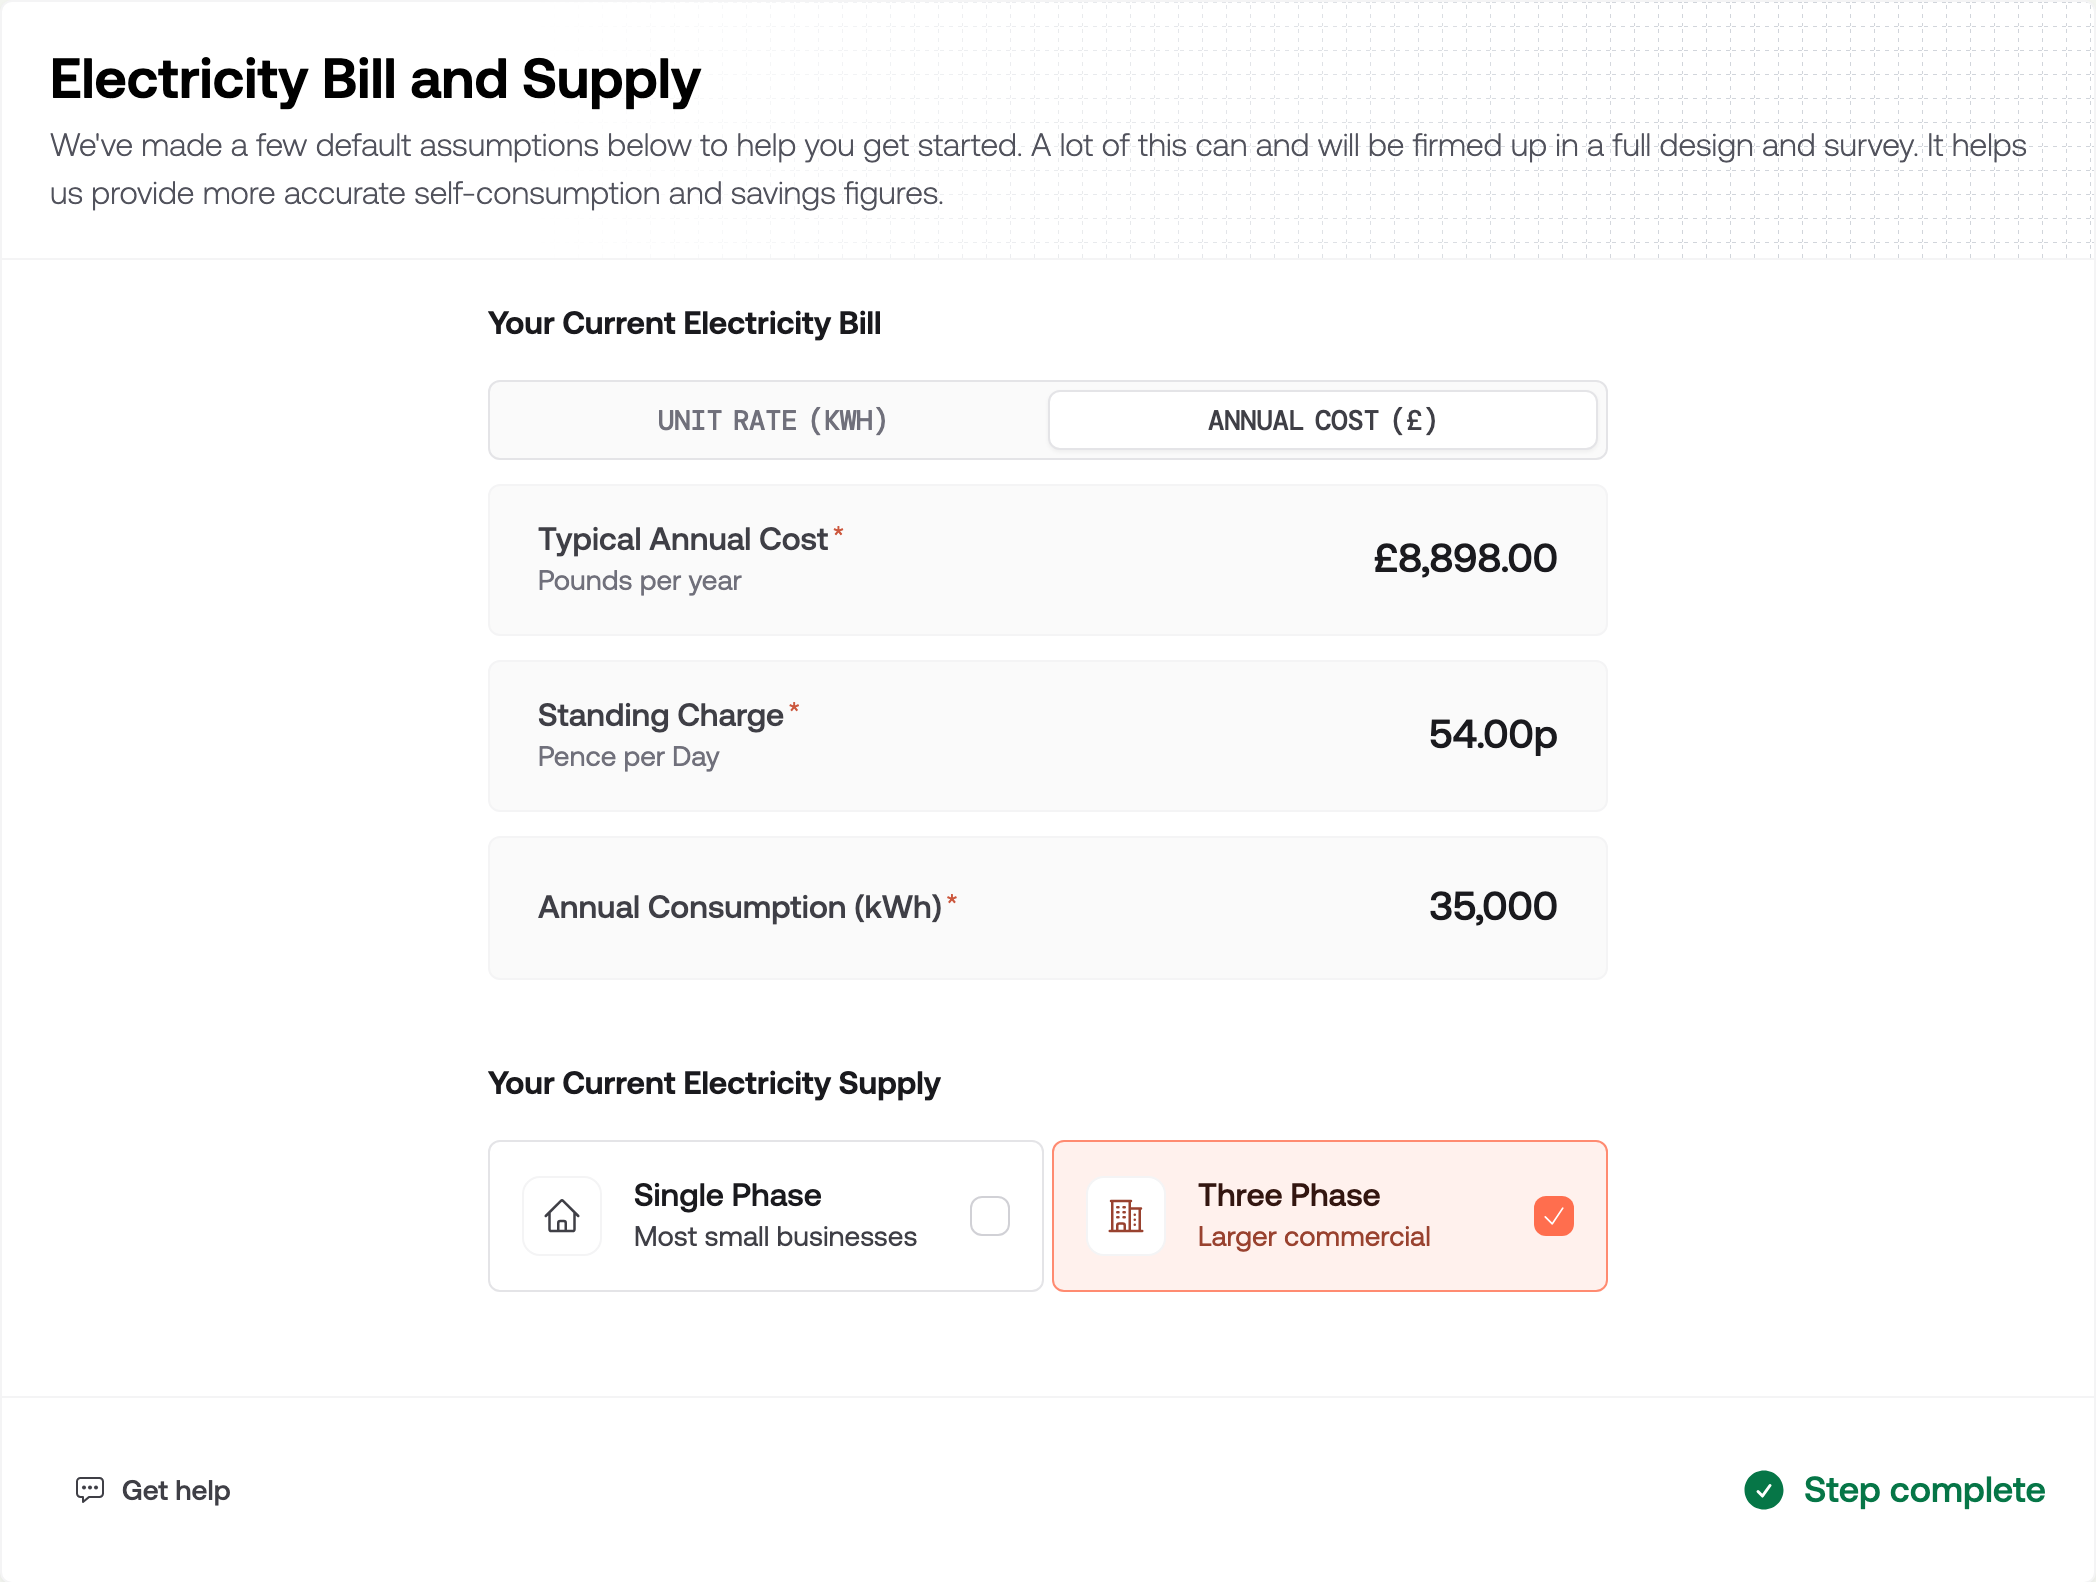
Start with Annual Consumption, seeded from the sector you chose. Then fill in what the business has told you about costs:
- Choose how you know the site's costs with the UNIT RATE (KWH) and ANNUAL COST (£) tabs
- Typical Annual Cost or the unit rate in pence, depending on the tab
- Standing Charge, in pence per day
Under Your current electricity supply, choose Single Phase, which the tool describes as most small businesses, or Three Phase for larger commercial sites. This decides which hardware you will be offered later: every package is marked as compatible with one supply or both, and incompatible ones are not shown. If the packages section later offers fewer than you expected, this is usually why.
The figures start from your account's defaults, so most quotes need a nudge rather than a rewrite. Defaults are set per account, alongside the rest of the tool's settings.
Clicking Next step here sets the tool working on the building: it fetches satellite imagery for the pin and prepares a roof design. Give it a few seconds before the next section appears.
Roof configuration
Now lay out the roof. Up to four ways of working are offered, chosen with the AI, ADVANCED, STANDARD and APPROXIMATED buttons:
-
AI — the tool finds the roofs on the building for you and fills them with panels. Use Remove panel, Add panel or the slider on the menu at the bottom of the map to set one panel count for the whole property. The slider fills the best roofs first, using whichever portrait or landscape layout fits the most panels on each roof, and stops at the most panels the property can hold. Roofs are not drawn on the map in this mode, and roofs too small for four panels are left out. Poorer-facing roofs, such as north-facing ones, are filled last as the slider moves up. Click a panel to select it, shift-click or shift-drag to select several, and delete them with the Delete key or the Delete panels button; panels cannot be moved, and moving the slider afterwards fits the layout again, so earlier deletions are not kept. The AI button only appears when the tool finds at least one roof that can take four panels. Switching into or out of AI clears the roofs, panels and obstructions on the design, and asks you to confirm first if there is anything to lose.
-
ADVANCED — every tool: draw roof outlines and obstructions, drag vertices, set pitch and material per roof, and move individual panels. A new quote opens here for you.
-
STANDARD — draw roofs and place panels, without obstructions or the extra Advanced menu items. This is what your customer works in.
-
APPROXIMATED — no drawing at all. The tool lays an approximate number of panels over the imagery; use Remove panel and Add panel on the menu at the bottom of the map to change the count (there is no panel-count slider and no cap tied to roof size). Quick for a rough figure, but the panels are not related to the shape of the building, so it is a poor basis for a quote you intend to send.
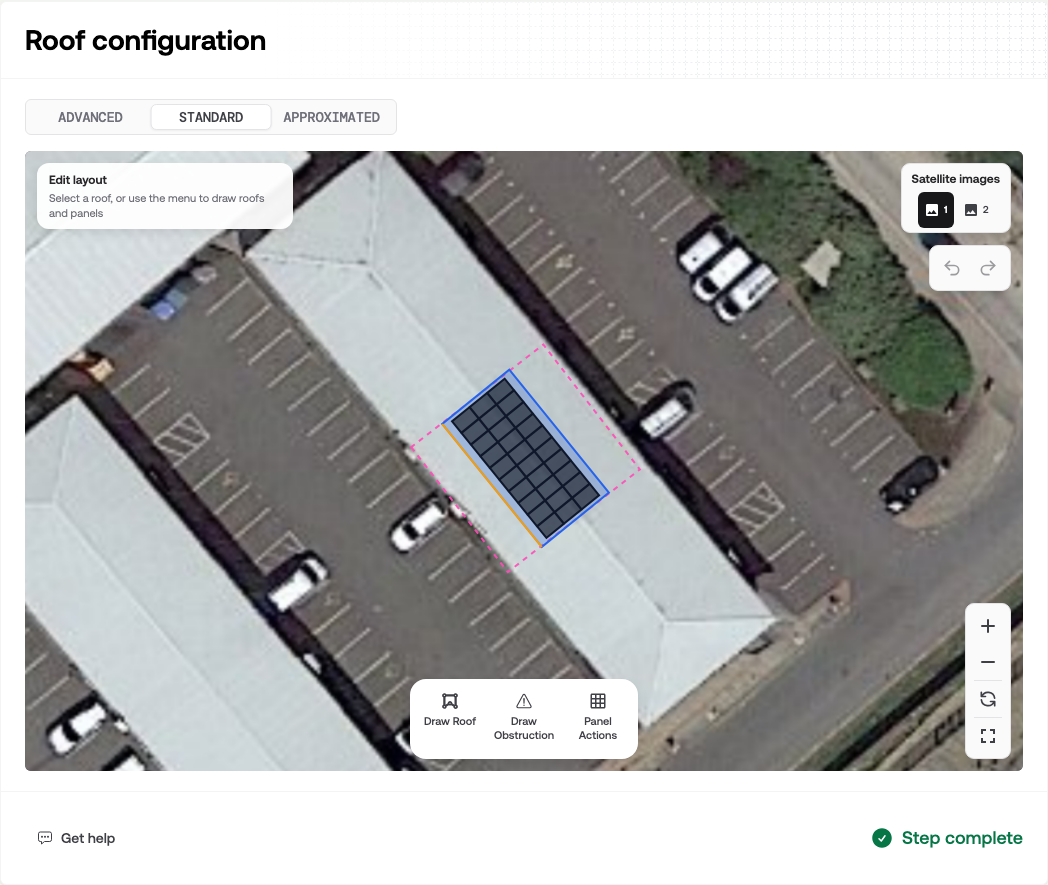
Draw the roof from the menu at the bottom of the map. Draw Roof puts you in drawing mode: click each corner of the roof plane in turn, then click the first corner again to finish. The panel in the top left tells you what the editor is waiting for at each point. In ADVANCED, select a roof and Panel Actions offers Auto-fill panels to lay panels across it, Add Panel to place them one at a time, and Clear panels to start again. With more than one roof drawn, select the one you mean first. A selected panel can also take Add Adjacent Panel. In STANDARD, selecting a roof offers Delete roof, Remove panel, Panel count (showing how many panels are on that roof), Add panel, and Change to portrait or Change to landscape. Panel count stops at the most panels that roof can hold for the current orientation. Switching orientation lays the panels out again and drops any that no longer fit. Panel Actions, Add Adjacent Panel, Draw Obstruction, gutter, roof direction, and Roof settings are ADVANCED only.
With a roof selected you can drag it to move it, nudge it with the arrow keys, and drag its handles to reshape it. The arrows in the top right of the map undo and redo.
Two controls repay knowing. Satellite images switches between the images available for the site, numbered 1 and 2; when one is out of date or badly shadowed, the other is often better. The buttons in the bottom right zoom, reset the view, and open the editor full screen, which is where the drawing is far easier. Reset fits the roofs you have drawn, or the property boundary if you have not drawn any yet.
The dashed outline around the building is the property boundary that came with the address, not something you drew. On a business park it can be a few metres out from the imagery, or cover a yard as well as the unit. Draw against what you can see in the picture rather than lining your roof up with that outline.
Large flat commercial roofs are usually one plane with a shallow pitch, so a single roof outline often covers the whole array. In ADVANCED, open Roof settings on the selected roof to check the pitch and material, as both feed the output figures.
Click Next step. The design goes to the server to be costed and yielded, which takes a moment.
Solar output
This is where the roof becomes a number.
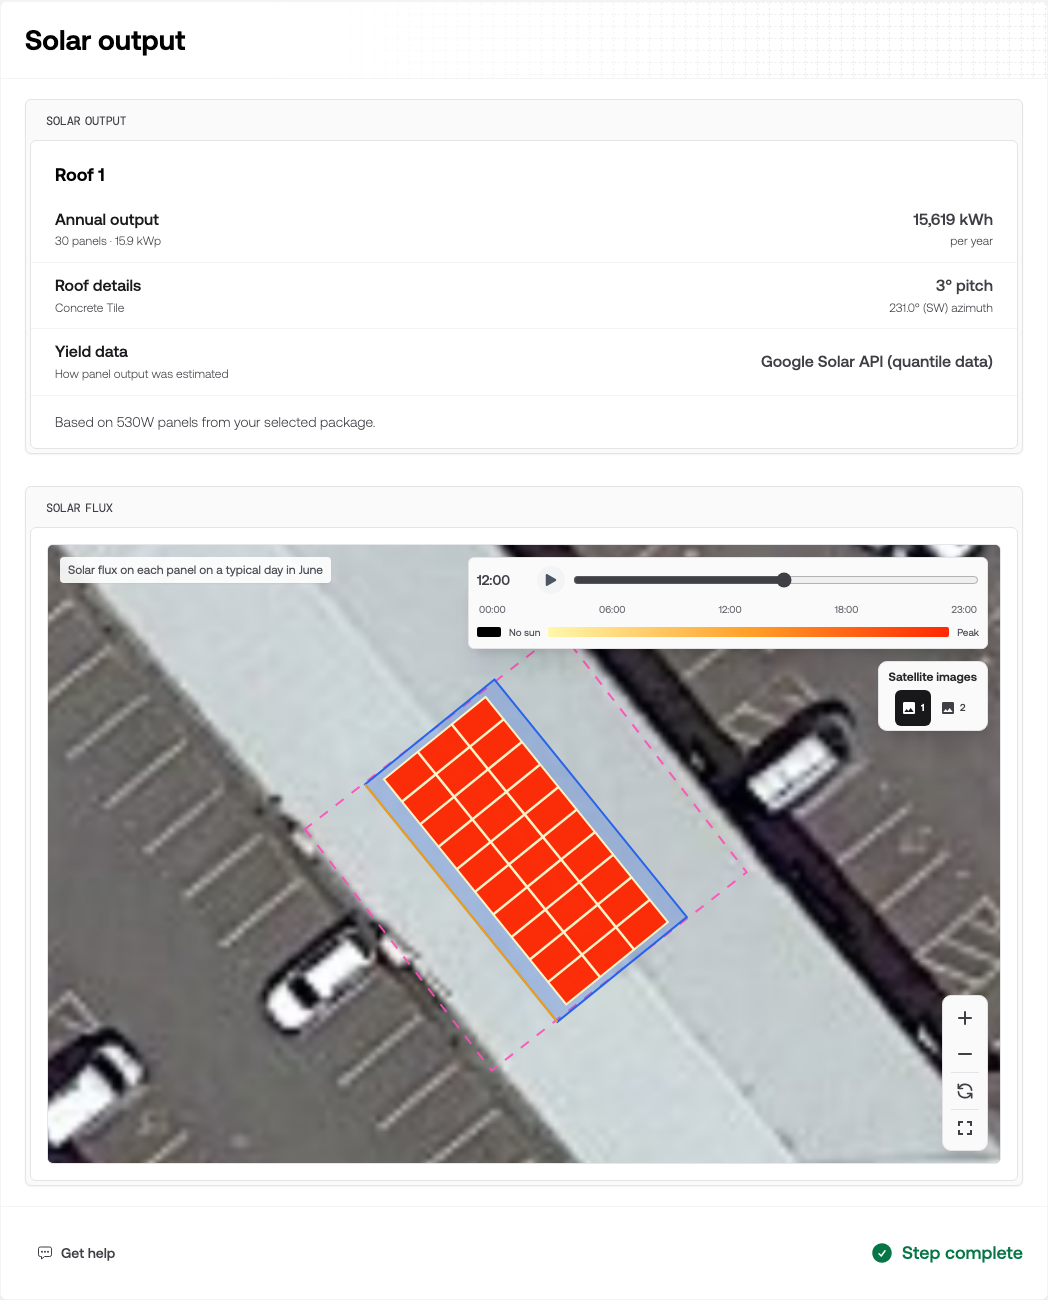
Each roof you drew gets its own block: Annual output in kWh with the panel count and installed kWp, Roof details with the material, pitch and azimuth, and Yield data recording where the generation estimate came from. Where there are several roofs, each one's share of the total is shown as well. A note at the foot records which panel wattage the figures assume, taken from the package you go on to choose.
The material is worth a glance. A roof drawn on an industrial unit still starts from the account's default, which is usually a domestic one, and it feeds the output figures.
Below that, SOLAR FLUX animates a typical day in June, panel by panel, from unlit to peak. Press play, or drag the slider to hold it at a particular hour. A single flat plane lights up evenly, as the one above does; where it earns its keep is a roof with several pitches or something shading part of it, when you can show a customer exactly which panels are carrying the array.
Click Next step.
Tailored hardware packages
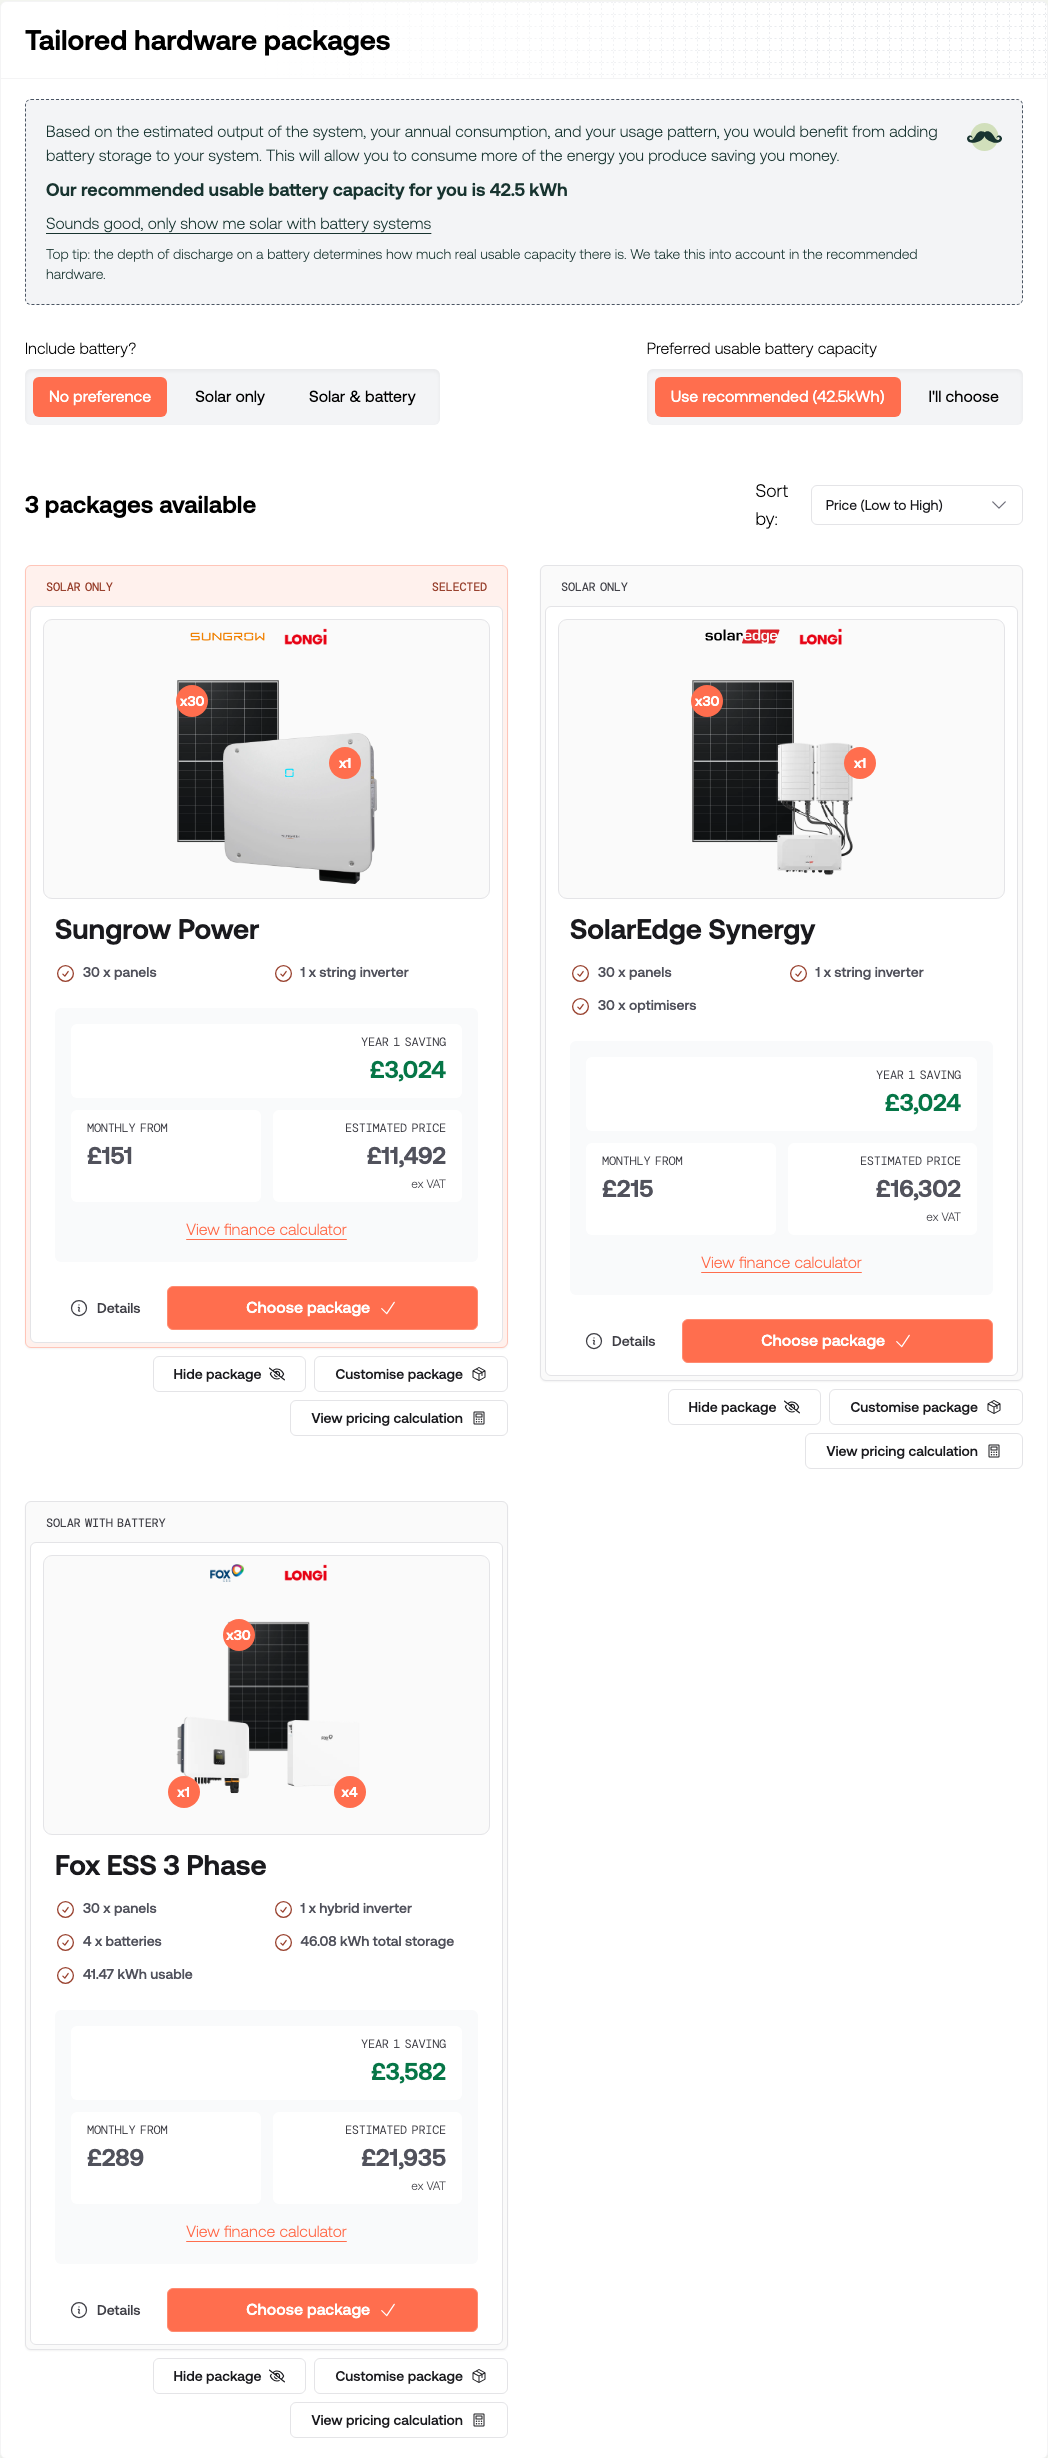
Above the packages sit two questions. Include battery? filters the list to Solar only or Solar & battery, or leaves it at No preference. Preferred usable battery capacity either takes the recommendation the tool has calculated from the site's consumption, or lets you set the capacity yourself with I'll choose.
Each card shows the kit, the year one saving, an estimated price and a monthly figure if you offer finance. Details opens the full specification, and View finance calculator breaks down the monthly cost.
Click Choose package on the one you want. That choice is what completes this section — there is no Next step button here.
While you are building the quote yourself, each card also has Hide package, Customise package, and View pricing calculation. Your customer does not see those controls.
Hide package takes that option off this quote. A 1 package hidden control then appears in the top bar; click it to open Restore hidden packages and put it back.
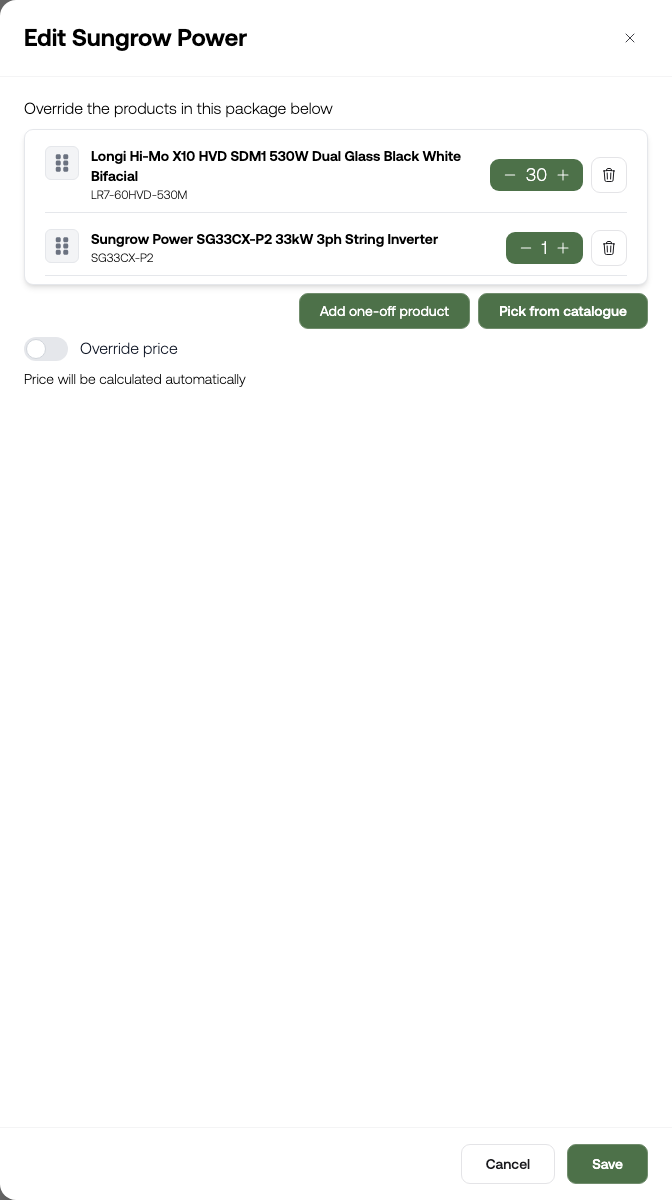
Customise package lets you change the products, quantities, and price for this quote only.
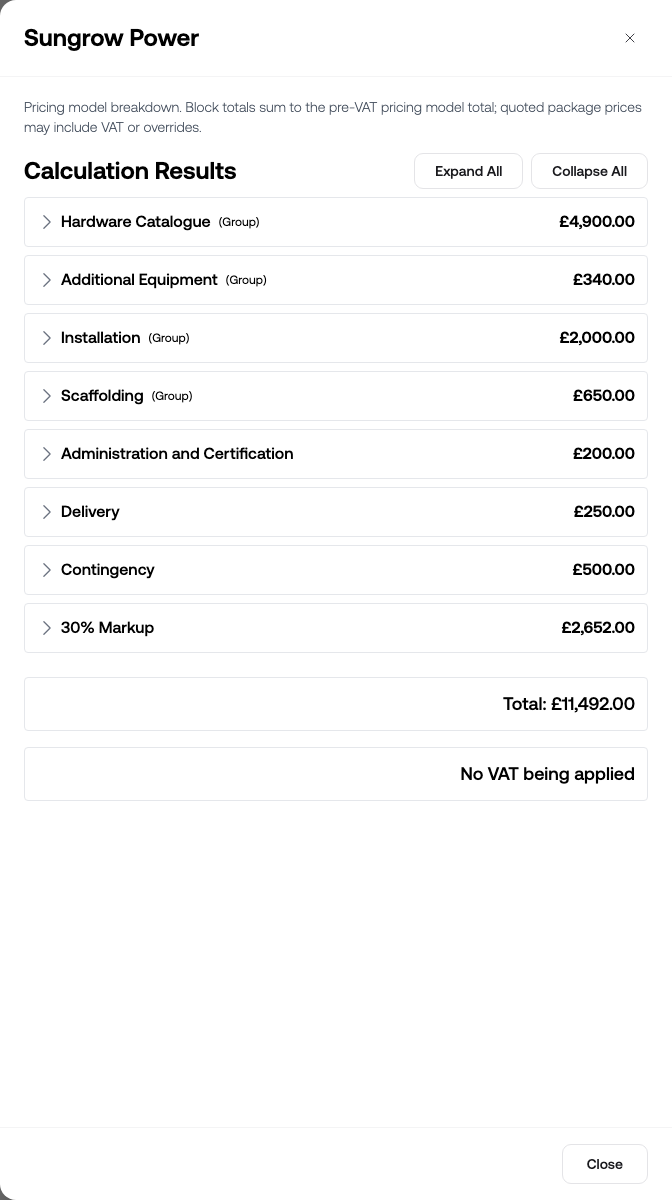
View pricing calculation shows how the estimated price was built.
Two things affect what you see. The list is filtered by the supply you chose under Electricity Bill and Supply, and the packages on offer, their order, and any discount applied to them are all configured per account.
Tariff selection
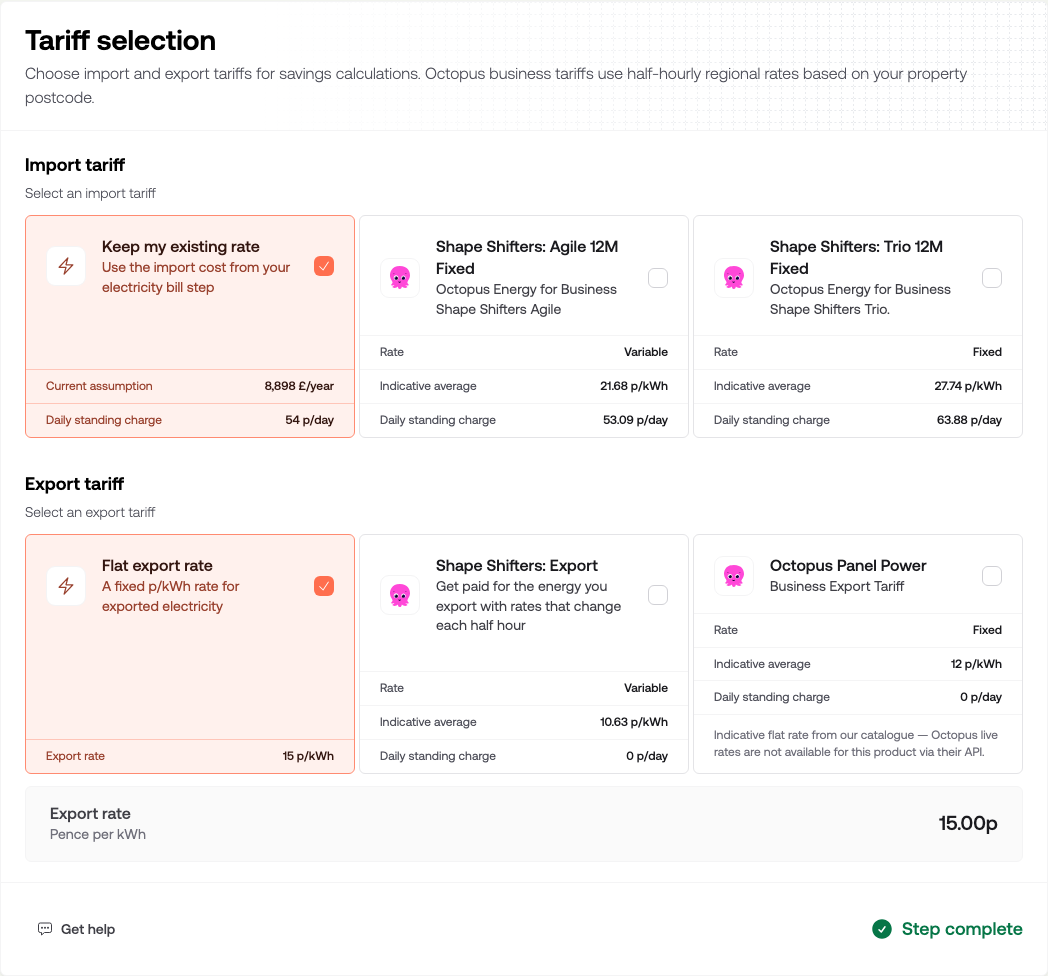
Import tariff decides what the business is assumed to pay for the electricity it no longer needs to buy. Keep my existing rate uses the figures you entered earlier. The alternatives are Octopus Energy for Business products, which use half-hourly regional rates for the site's postcode rather than a single average, and each card shows an indicative average and standing charge so you can see what you are switching to.
Export tariff does the same for the electricity the site sells back. Flat export rate uses a single rate you set in Export rate, which starts from your account's default. The Octopus export products vary through the day instead.
For a site that generates most at times it cannot use the energy, the export choice moves the numbers noticeably. Click Next step.
Savings
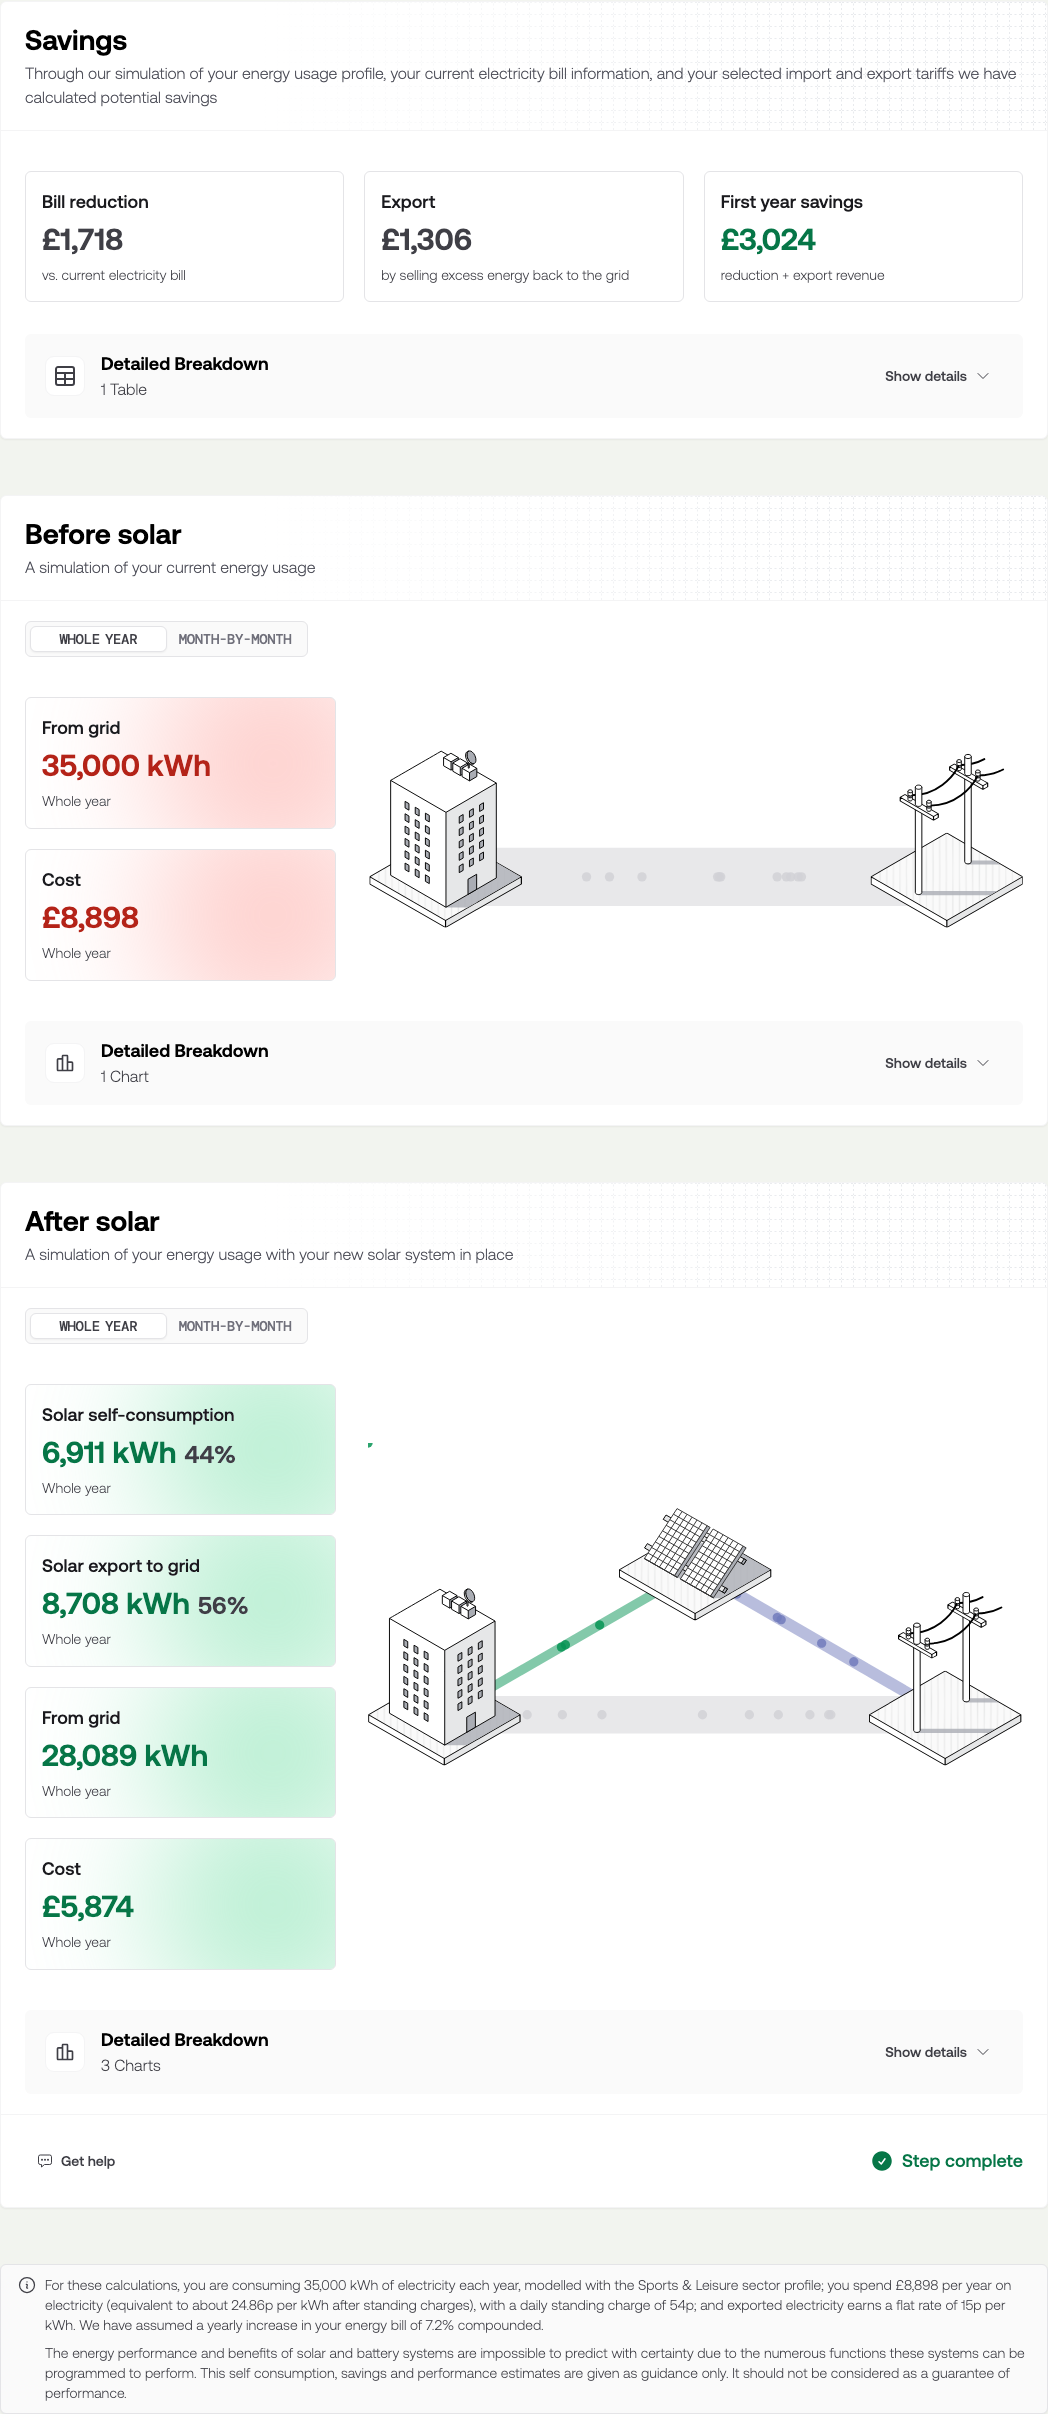
Nothing to fill in here. Headline savings models the site's year with and without the system, using the usage profile, the bill figures, and the tariffs, and reports three numbers: Bill reduction, Export, and First year savings, which is the two added together.
Under them, Before solar and After solar show where the energy comes from and goes in each case, with WHOLE YEAR and MONTH-BY-MONTH views. After solar splits the generation into Solar self-consumption and Solar export to grid, as a figure and a percentage, which is the split a commercial buyer will want to interrogate: the higher the self-consumption, the better the case, because the site avoids buying at the import rate rather than selling at the export one. Show details next to each Detailed Breakdown opens the tables and charts behind the figures, and the note at the foot lists the assumptions used. The multi-year bill chart, the savings over time, and LCOE all use the same generation degradation from your account Defaults — 0.5% a year unless you change it. Year-one figures stay undegraded.
Below that, Levelised cost of energy (LCOE) shows the levelised cost of the system in pence per kWh — what each unit the array produces costs over its life — next to Your current grid rate, the average import rate used in this quote, and the difference between the two. The figure uses your account defaults for lifetime, operating cost, inverter replacement, and discount rate, and the same generation degradation as the savings chart and savings over time. It is a unit cost, not a second savings number: year-one savings stay the three figures at the top. You can hide the block under the tool's Defaults.
Click Next step.
Savings over time
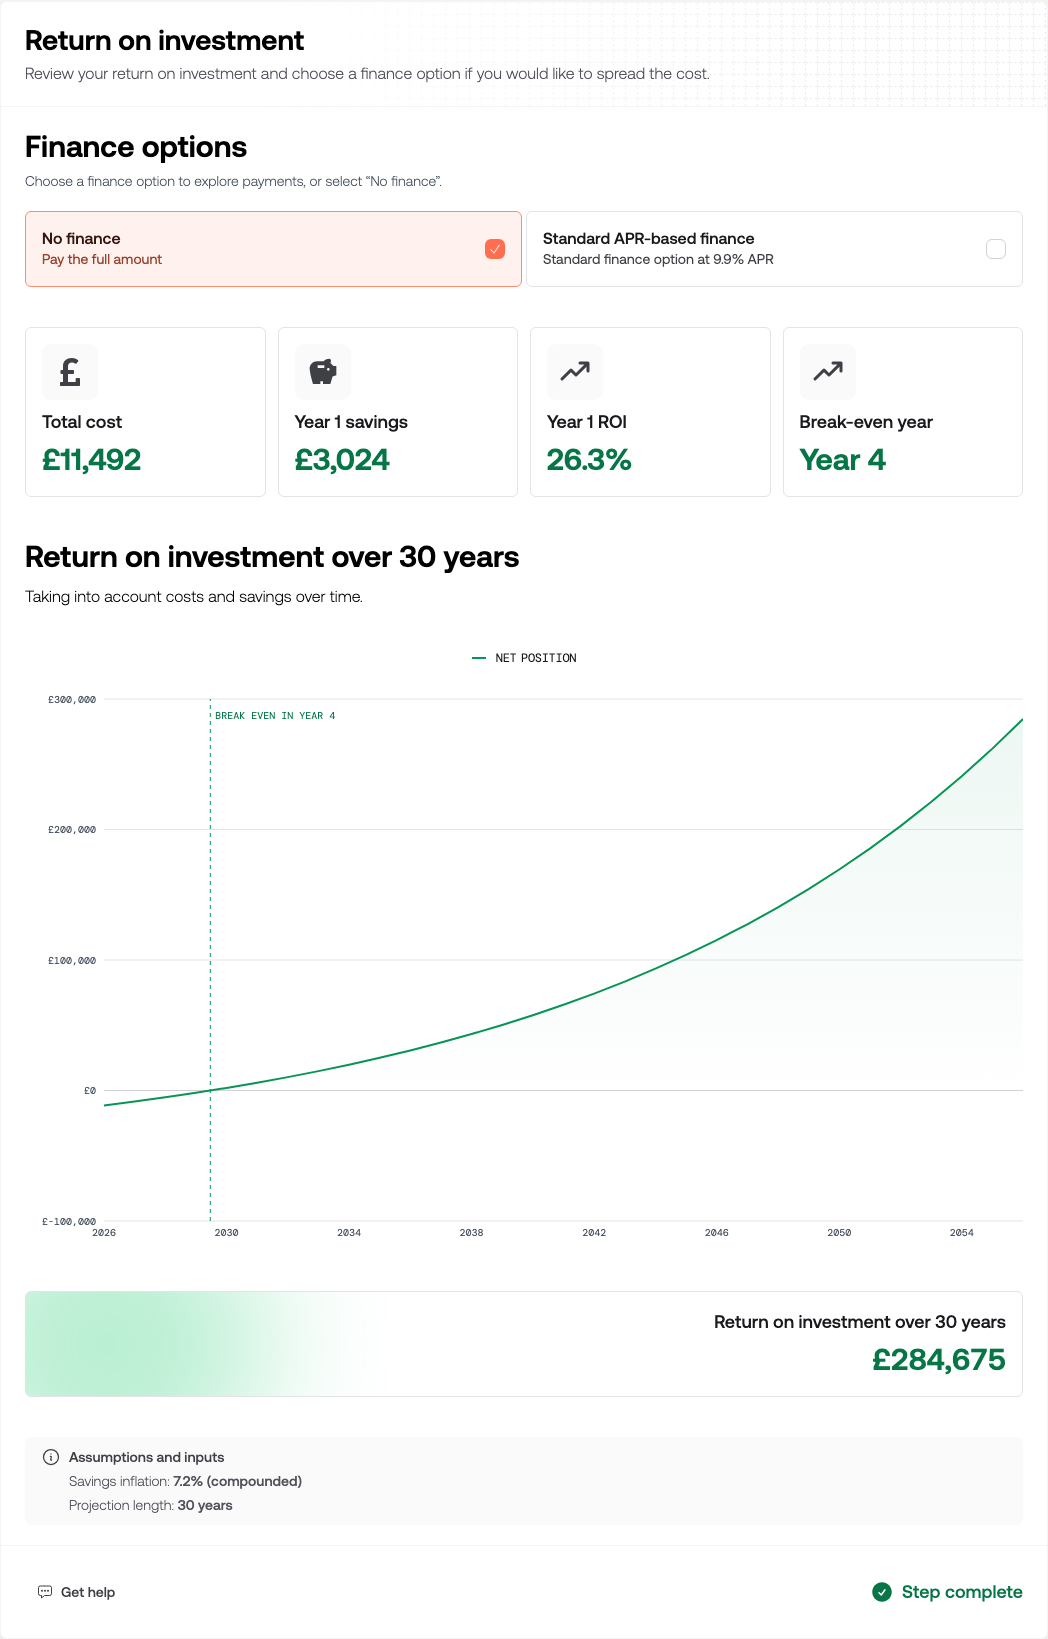
For most commercial buyers this is the section that decides the job.
Finance options comes first: No finance prices the job as an outright purchase, and any finance products you offer appear alongside it with their rate. The choice changes the figures below.
Annual Investment Allowance is its own card above Savings over time. It shows the year-one tax the purchase can shelter: qualifying spend, AIA claimed, year 1 tax saving, and effective net cost. It is not a bill saving and it is not mixed into LCOE. Click Edit assumptions to set business type, tax rate, whether they can use the deduction this year, and remaining AIA for this period — those stay on this quote. The card is hidden if you turn it off under the tool's Defaults, or if the chosen finance is not an owned system.
Then Total cost, Year 1 savings, and — when they are claiming AIA — Year 1 tax relief, then Year 1 savings rate and Break-even year. Tax relief is a one-off year-one cash figure from the AIA card; it is in the chart and the break-even year, and it is not added to later years. Assumptions and inputs at the foot shows the savings inflation rate, generation degradation when it is above zero, year-one tax relief when it is in the figures, and the projection length behind that curve. Those are set per account, and the inflation rate compounds, so a long projection at an optimistic rate produces a very large number. Check them before you quote a thirty-year return to anybody.
Click Next step.
Add-ons
If your account offers extras that apply automatically to commercial solar, they appear next under Additional options available for your system, and you confirm them as you would any other section. If it does not, the quote goes straight to the summary.
Summary
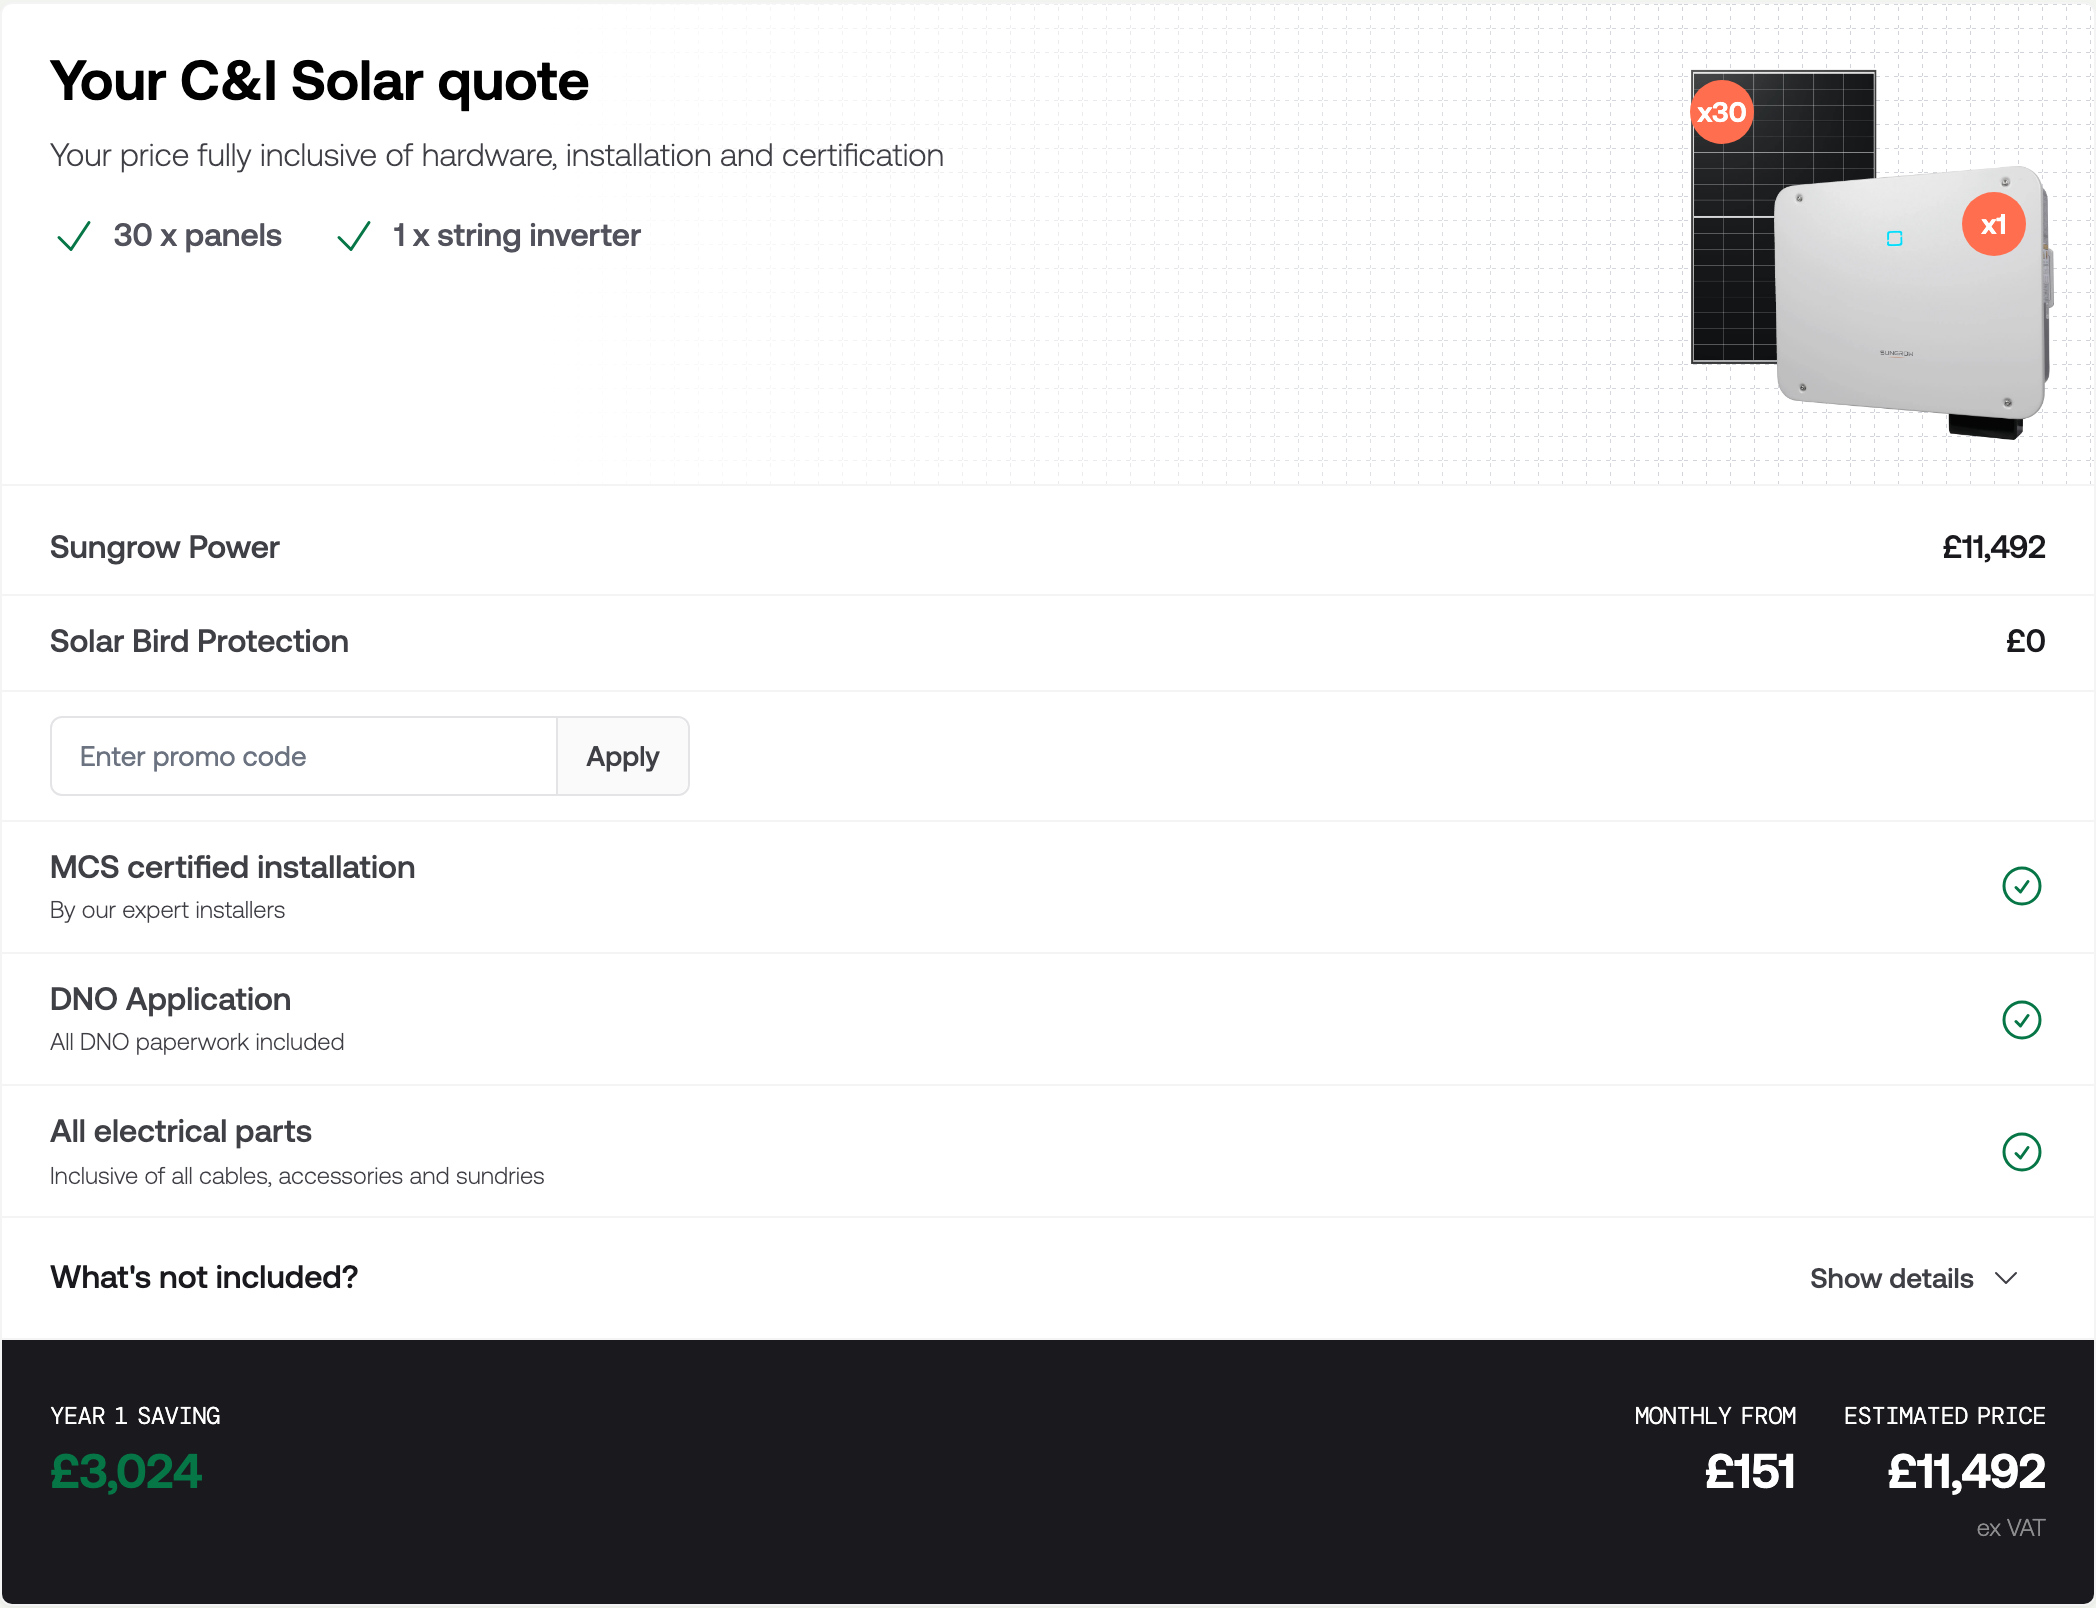
The last section is headed Your C&I Solar quote, and it is the quote as your customer will read it: the kit, then the chosen package and any add-ons itemised with a price each, then what the price includes — MCS certification, the DNO application, electrical parts — and a What's not included? line they can expand with Show details. If you have a discount code, enter it in Enter promo code and click Apply.
The bar at the foot carries the three figures a buyer looks for: YEAR 1 SAVING, MONTHLY FROM if you offer finance, and ESTIMATED PRICE, quoted ex VAT.
Below the price sits your own call to action — contact details, terms, a signature, an appointment, or a deposit, depending on how the tool's acceptance is configured. You cannot accept on your customer's behalf; acceptance is switched off while you are working inside the quote, so they have to open the link themselves.
Send it to your customer
Click Settings to link the quote to a contact, then Share to copy the web address or send it by email. Both are covered step by step in Quoting on a customer's behalf.
Check it worked
- Look down the sidebar. Every section has a summary line under it, and Summary is reachable.
- Open PDF in the sidebar and check the printable quote reads the way you would want it to arrive.
- Find the quote in Commercial Solar Quotes. It carries the Created by Admin tag, and Has Contact Info once you have set a recipient.
- Open the shared web address in a private browser window. That is exactly what your customer sees.
Related
- What your customer sees — the same eleven sections from their side
- Quoting on a customer's behalf — setting a recipient, sharing, and emailing a quote
- Find and follow up on instant quotes — working the list once the quote is out